Advanced Thermostat and RF Controller Pairing Guide
Getting Started
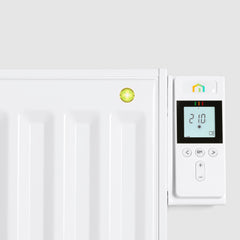
This thermostat supports four main modes (Auto, Comfort, Eco, Frost), a Boost function, occupancy detection, open window detection, child lock, pilot wire, and optional RF remote pairing. You can schedule daily/weekly programs or let it auto-learn your routine.
Buttons & Indicators
- Power Turns the thermostat ON or sets it to Standby (OFF).
- Mode Cycles through Auto → Comfort → Eco → Frost.
- Boost Temporarily raises the temperature to max heat.
- + / – Adjust temperature, time, or settings.
- OK Confirms selections.
Screen Icons
- Mode symbols: Auto, Comfort, Eco, Frost
- Heating / Boost / Open Window / Occupancy indicators
- Day of week (1=Mon, 2=Tue, etc.)
- Keypad lock icon (padlock)
Turning Power On/Off
- Turn ON: Press Power. A brief beep sounds, and the thermostat starts in Auto mode.
- Standby: Press Power again to stop heating. The screen remains lit, but no heat is produced.
Choosing a Mode
- Auto Follows a weekly schedule (learned or manually programmed).
- Comfort Maintains a single set temperature (default 19°C).
- Eco Lowers Comfort mode by 3.5°C adjustable to 8°C differential from comfort mode (useful for nighttime or short absences).
- Frost Keeps 7°C to prevent freezing. Mainly used in snow or very cold locations.
Boost Mode
Press Boost to heat at maximum power for 60 minutes (default).
- Within the first minute, adjust Boost time using + / –. Adjustment is in 5 min intervals.
- Press Boost again to cancel prematurely.
Checking Energy Consumption
Color Gauge
- Green: Low usage (~19°C or below)
- Orange: Moderate usage (~19–22°C)
- Red: High usage (above 22°C)
kWh Reading & Reset
- Briefly see total consumption (kWh) by pressing any button.
- To reset: Press OK, then hold + / – together for 5 seconds.
Programming (Schedules)
-
Set Comfort/Eco Temperatures
- While in Comfort or Eco mode, press + / – to change the temperature (range 7–30°C).
-
Auto-Learning
- Let the thermostat track your usage over the first week to build a custom Comfort/Eco schedule.
-
Manual Schedules (P1, P2, P3)
- P1: Comfort 6:00–22:00, Eco overnight
- P2: Comfort 6:00–9:00 & 16:00–22:00, Eco otherwise
- P3: Comfort in shorter blocks (e.g., morning, midday, evening)
How to Set a Schedule
- Hold Mode for 5 seconds to enter programming.
- Adjust the time and day using + / –, then press OK.
- Assign a program (P1/P2/P3) or choose Auto/Comfort/Eco for each day.
- To customize times in P1/P2/P3, press OK again and adjust start/end in 30-min increments.
Additional Features
Open Window Detection
If the temperature drops suddenly (e.g., a window opens), the thermostat switches to Frost. Press any button to resume the previous mode.
Occupancy Sensor
Automatically lowers temperature in stages if no movement is detected, eventually reaching Frost if the room is unoccupied for days. Restores the prior setting when you return.
Child Lock (Keypad Lock)
Hold “ok” button and left and right arrow keys altogether until pad lock icon appears/disappears.
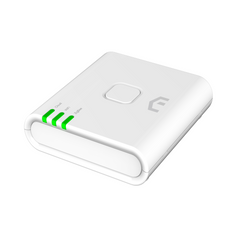
RF Remote Pairing
- Switch to Frost mode.
- Hold Mode for 5 seconds until “PAI” appears.
- Follow your RF remote’s pairing steps.
- To unpair, hold + / – for 5 seconds (still in Frost mode).
Advanced Settings
These options let you fine-tune or lock down the thermostat. No separate manual is required—everything is shown below. Access these settings in Standby or Frost mode.
-
Entering Advanced Settings
- Press and hold Mode for about 10 seconds (some models may vary).
- A menu or code (e.g., “F1,” “Adv,” etc.) appears.
- Use + / – to scroll through each parameter.
- Press OK to select and adjust.
- Press Mode (or wait a few seconds) to move to the next parameter.
- Hold Mode again (3–5 seconds) to exit.
-
List of Common Advanced Parameters
-
PIN Code Protection
- Toggle On/Off. When On, you’ll be prompted to set a 4-digit code.
- Once active, changing certain settings or accessing advanced menus will require the PIN.
-
Power Limit
- Some models can limit max output (e.g., 500W, 1000W, or 1500W).
- Choose the wattage that matches your heater’s capacity to avoid overload.
-
Dual Optimization (Opti Comfort / Opti Eco)
- Opti Comfort focuses on maintaining your target temperature precisely.
- Opti Eco saves more energy by allowing slight temperature fluctuations.
-
Occupancy Detection On/Off
- Turn the infrared sensor off if false triggers occur (e.g., near curtains or heat vents).
- When Off, the thermostat won’t auto-reduce heat if nobody’s present.
-
Automatic Open Window
- Default: Enabled. The thermostat switches to Frost when a rapid temperature drop is detected.
- Disable if your environment has frequent door/window changes that cause nuisance triggers.
-
Backlighting Level
- Adjust screen brightness (e.g., L1 = dim, L2 = medium, L3 = bright).
- A brighter screen is easier to read but uses slightly more power.
-
PIN Code Protection
-
Saving Changes
- Press OK after each adjustment.
- Exit advanced settings by holding Mode again, or let it time out after ~30 seconds of no input.
Resetting to Factory Settings
Press and hold OK until “rESt” appears.
- The display shows “nO.” Use + / – to select YES, then hold OK for ~5 seconds.
- The thermostat reverts to default settings (Comfort=19°C, Child Lock=off, etc.) and returns to Auto mode.
Technical Specs
- Voltage: 230V ±10%, 50Hz
- Max Power: 1500W resistive load
- Standby Consumption: < 0.5W
- RF Frequency: 2.4 GHz (<1mW output)
- Compliance: RED 2014/53/EU, ERP 2009/125/CE, ROHS 2011/65/EU
- ISO 9001 manufacturing standards
WEEE: Dispose of this product responsibly, following local electronic waste regulations.
For a full technical version, click here to get the manual as a PDF.